
How to Setup an SEO optimized Glossary in Webflow
Struggling to set up a glossary in Webflow? This guide walks you through creating a slick, alphabetized Webflow glossary using conditional visibility, without any fancy plugins. Perfect for anyone looking to add a professional reference section to their Webflow site!
When setting up a Glossary in Webflow, there’s no easy out of the box way for doing it. In this detailed guide we’ll walk through how to set up up a Webflow glossary page on your site.
Webflow only supports a limited number of collection lists to be displayed on a single page, so you won’t be able to add collection list elements separately for each letter of the alphabet. We will use conditional visibility on the page to style the letters and the terms differently on the glossary page.
How to set up a Glossary in Webflow using Conditional Visibility
Step 1: Setting Up Your Webflow Glossary Collection Structure
Creating a glossary in Webflow begins with establishing the proper collection structure. Start by creating a CMS collection for your glossary terms, setting up fields for terms and definitions.
Additionally, add a link field, and let’s call the field “Anchor link” this we will use to create a nice navigation for your terms on top of the list of terms. You collection fields should look something like this:
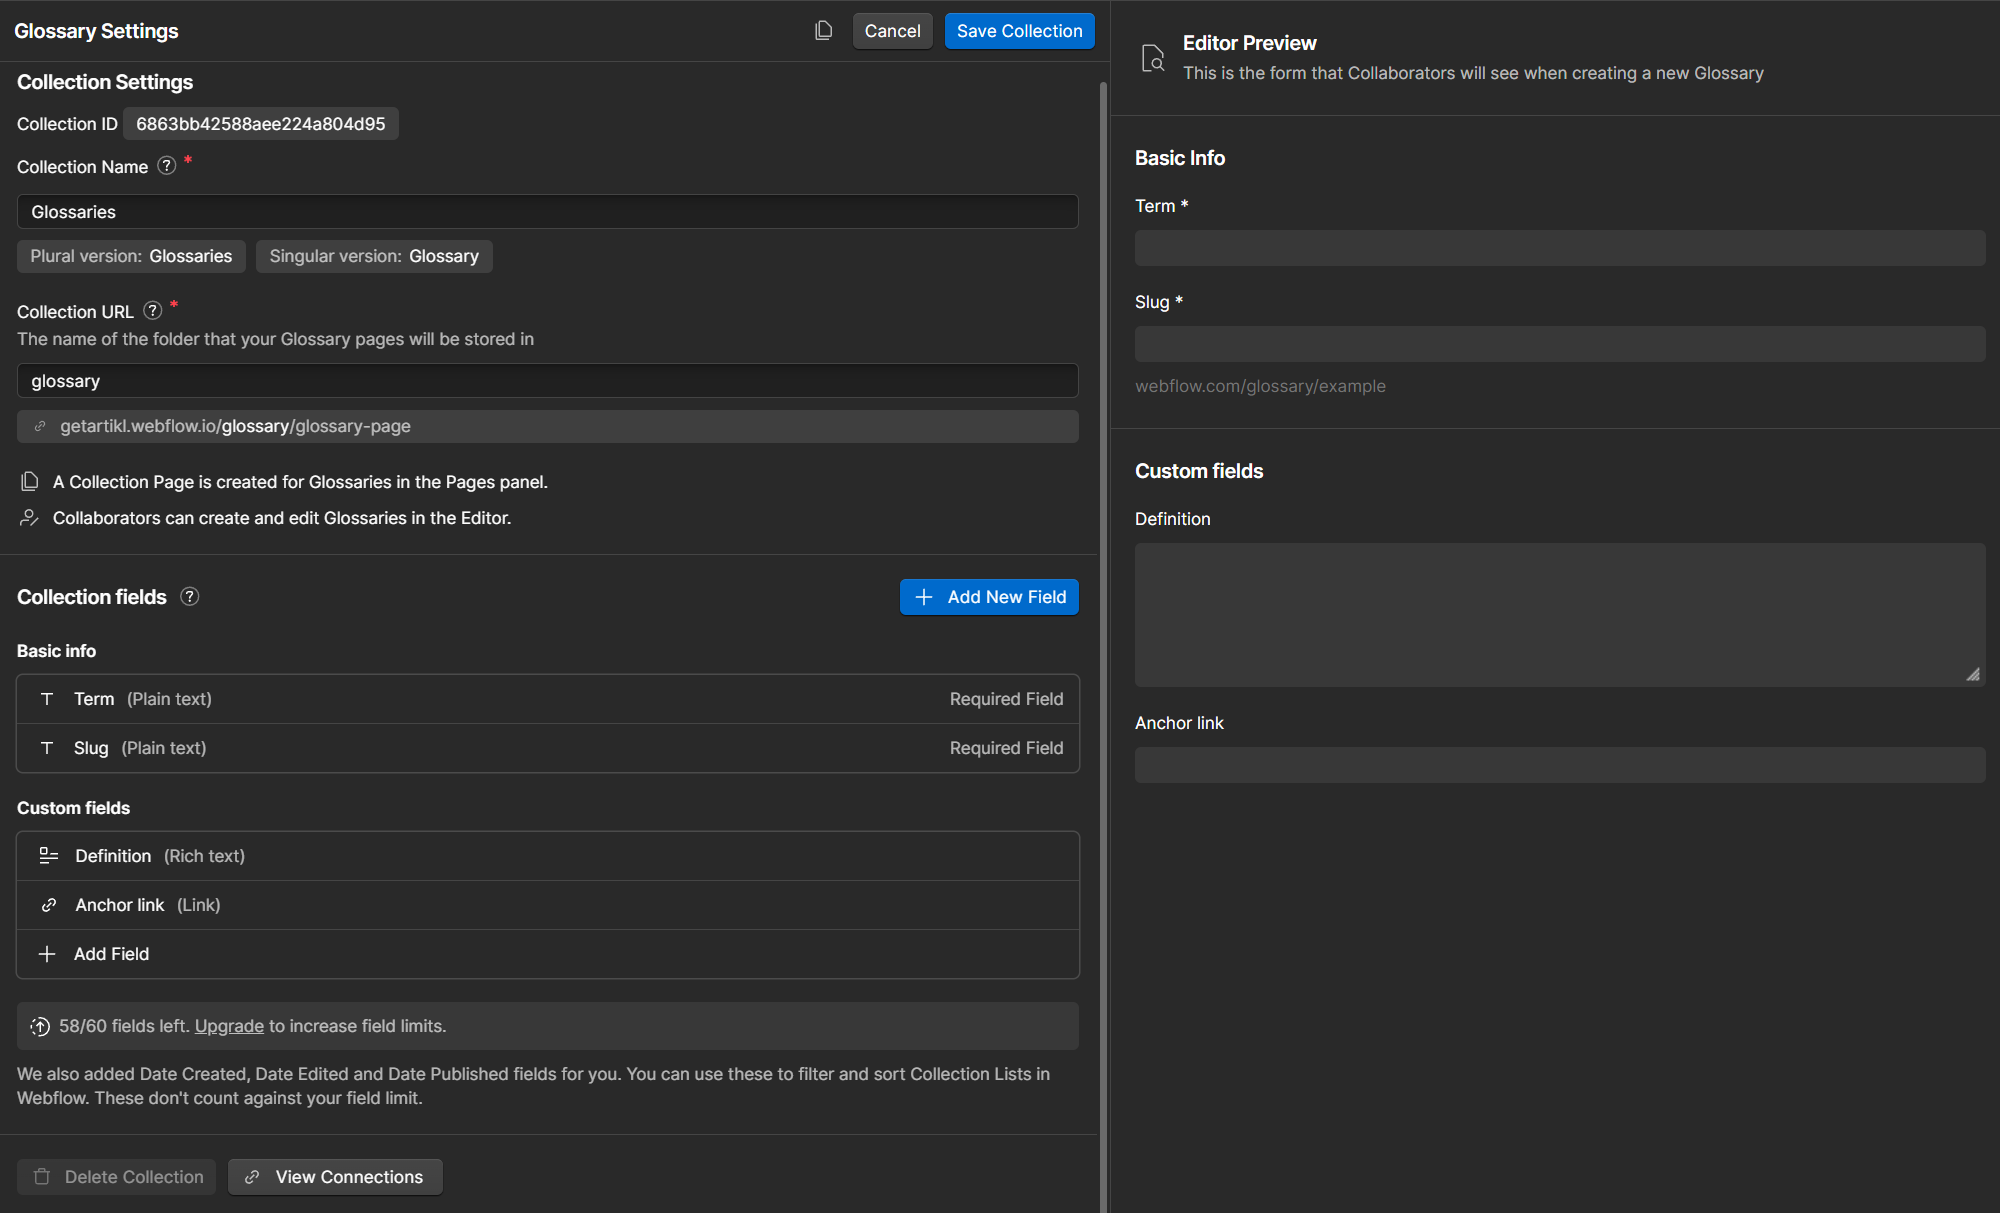
For your glossary to work nicely in Webflow, you will additionally need to include each letter of the alphabet into your collection (A, B, C, D, and so on…). For each of these letters, also use the Anchor link field and add for example “#A” and “#B” as the value.
Each letter is needed to be able to group all the terms under a letter heading on your glossary page. The anchor link field allows to create navigational links on the page.
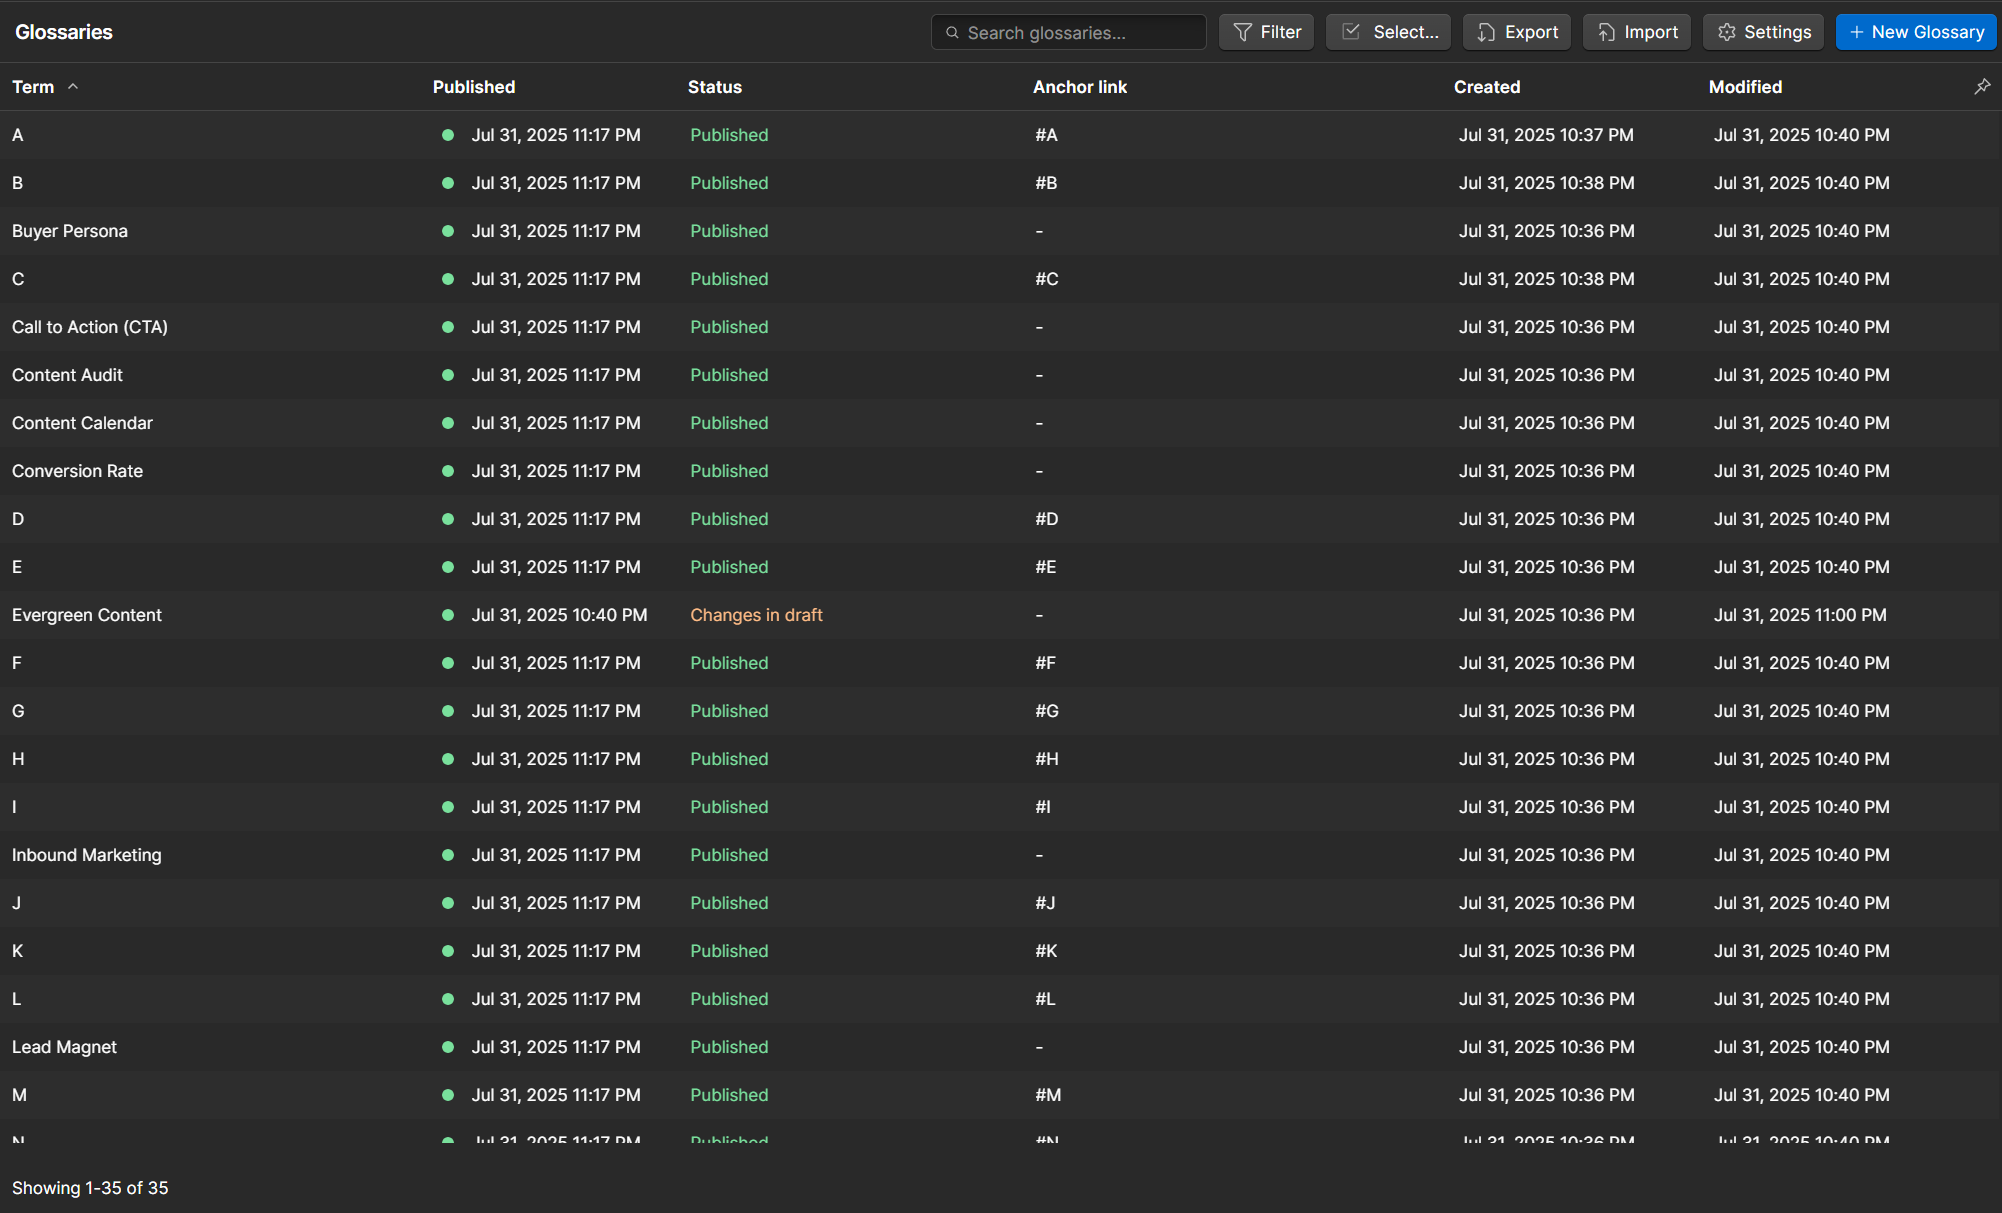
You will end up with a collection structure like this:
Step 2: Designing Your Webflow Glossary Collection Pages
Effective Webflow glossaries require thoughtful navigation design. For an ideal setup, create two pages: a glossary term page that lists all terms in one place, and a definition page that provides detailed explanations of each term.
Glossary term page
Start by setting up a page where you would like your glossary list to appear. For your page, design the overall look and feel according to your general Webflow site’s style.
Add an H1 to your page with whatever your glossary is about e.g. “Marketing Glossary”.
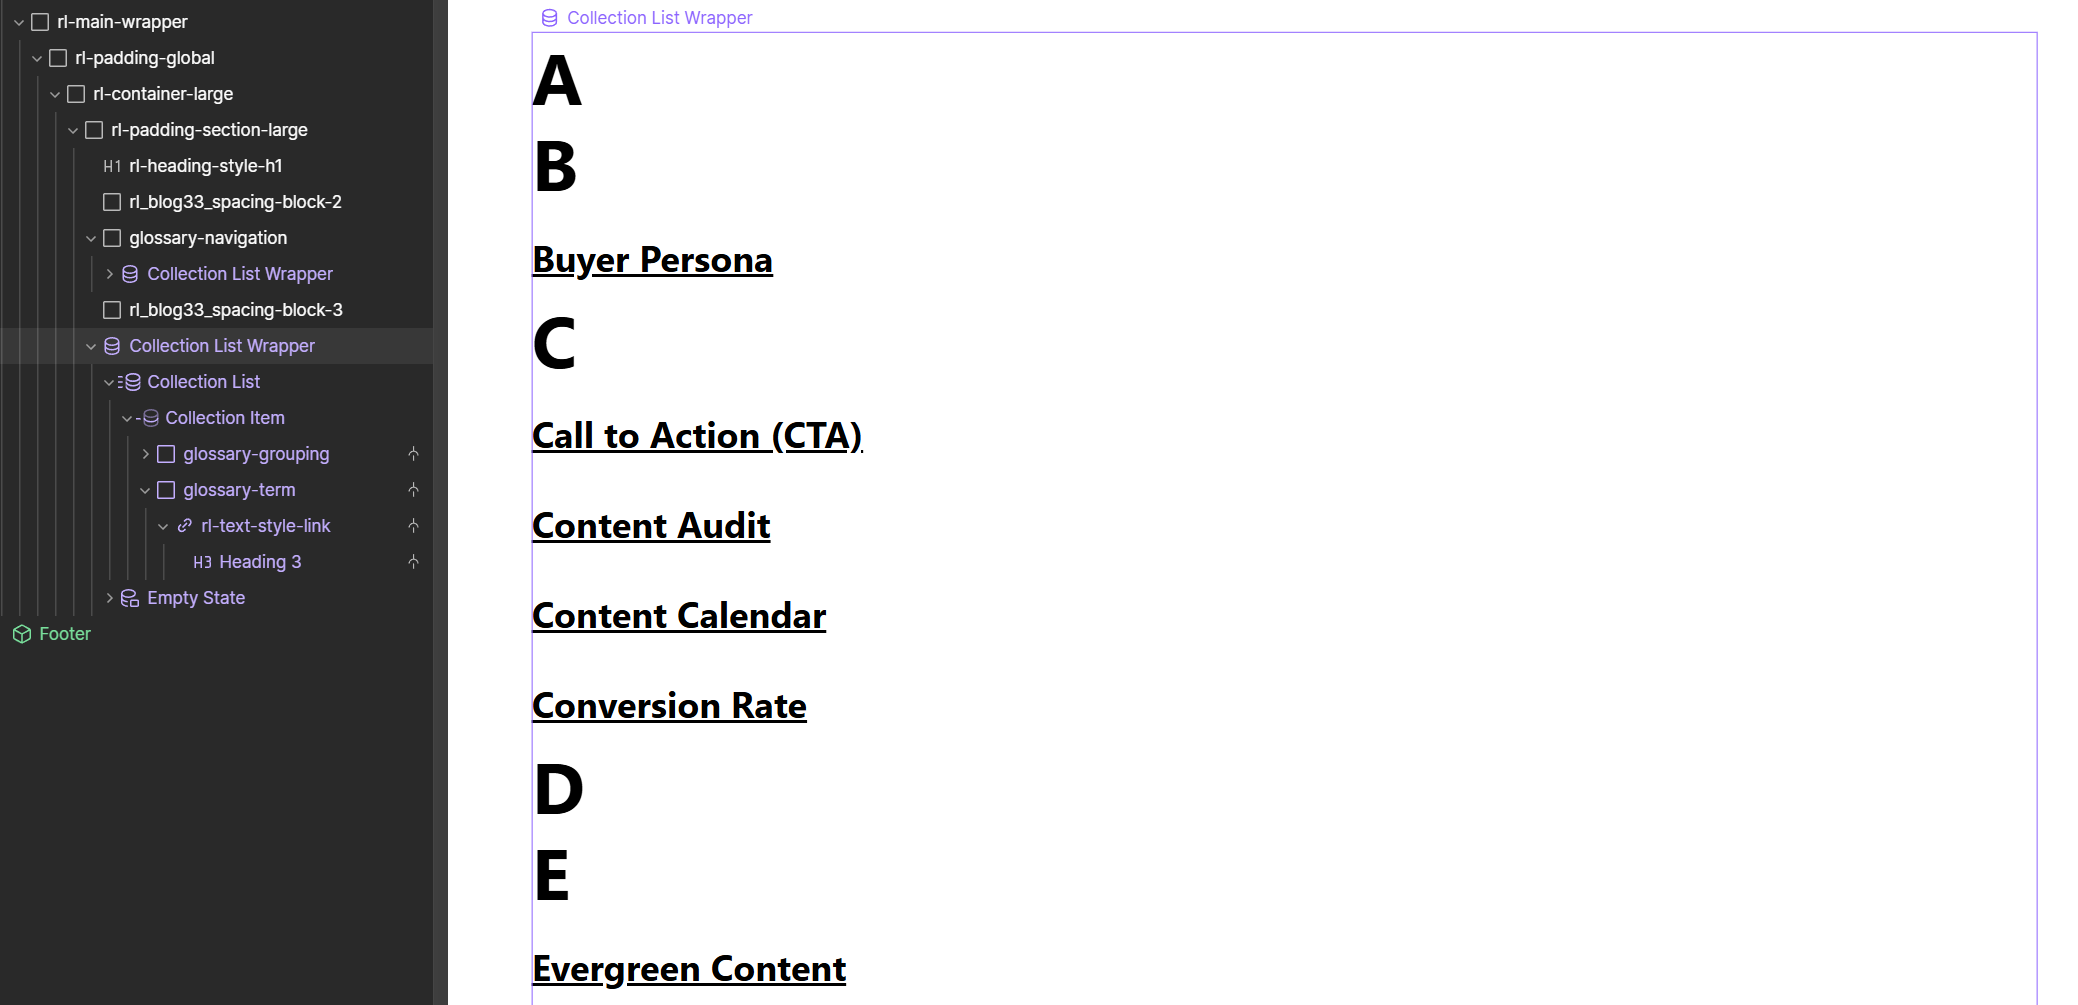
Next add a Collection List element to your page. Connect the Collection List to your Glossary collection. In the Collection List settings, add a Sort setting to be Alphabetical (A-Z) to ensure your alphabet and terms run from A-Z on the page.
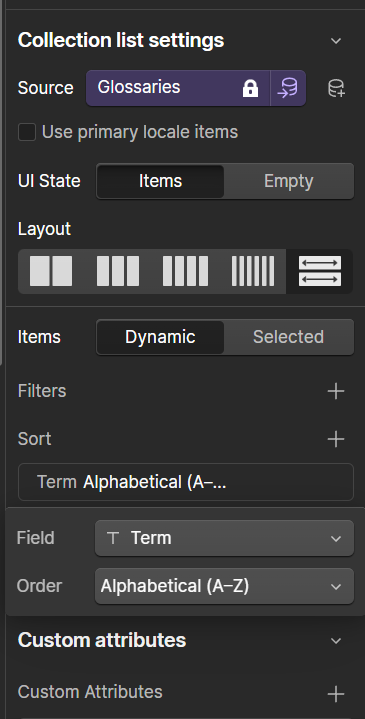
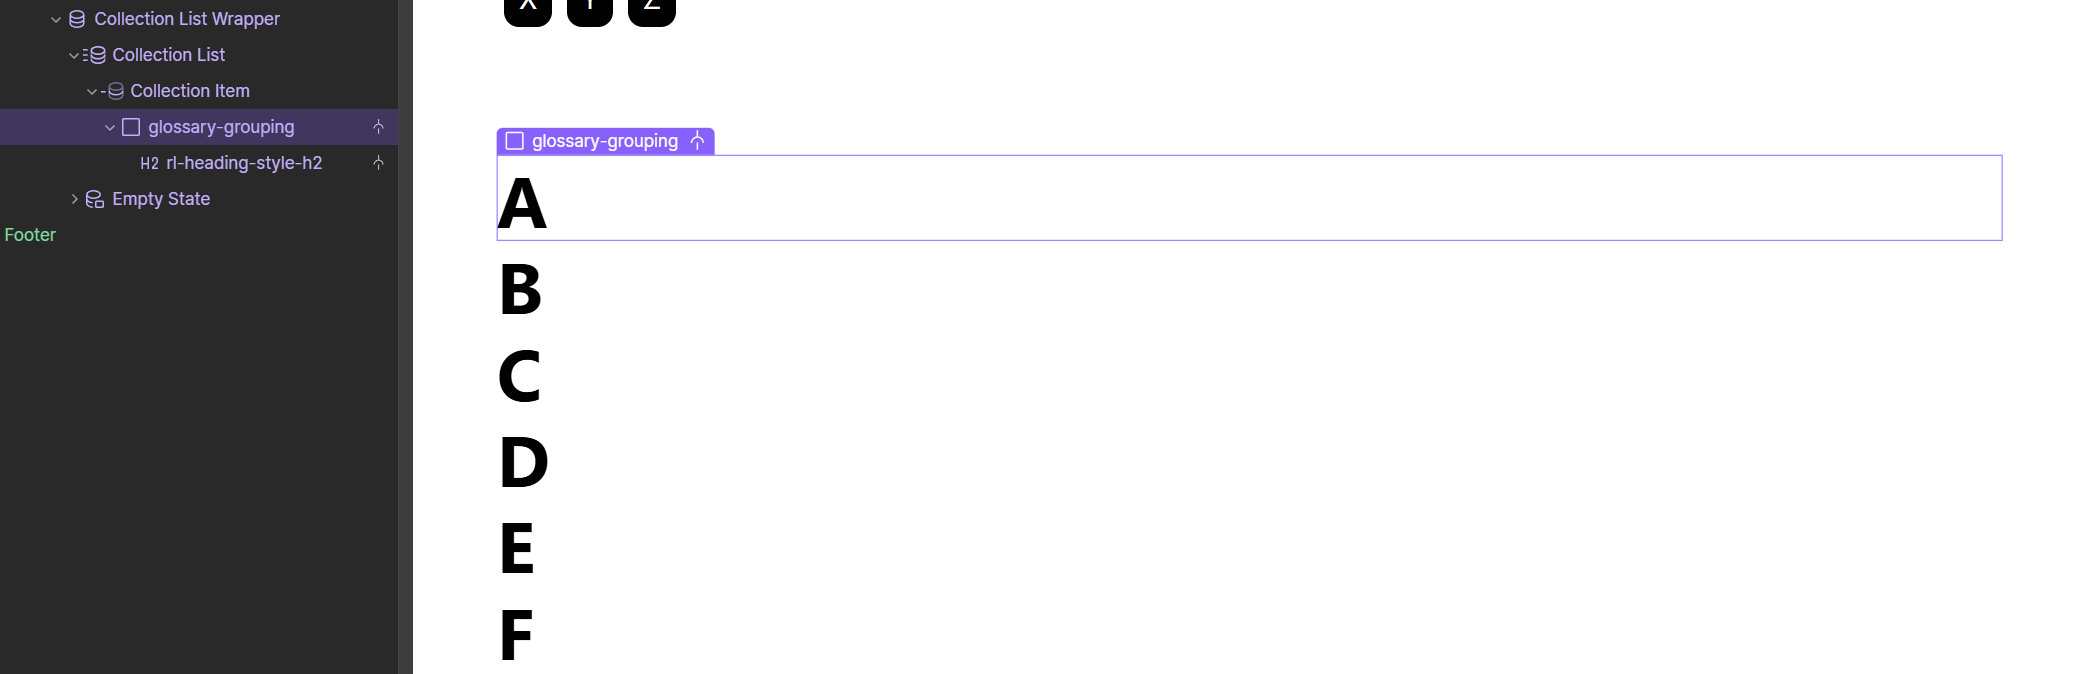
Inside the Collection Item element, you will need two Div elements.
The first Div will contain the letter of the alphabet. Let’s create the Div and give it the name “glossary-grouping”.
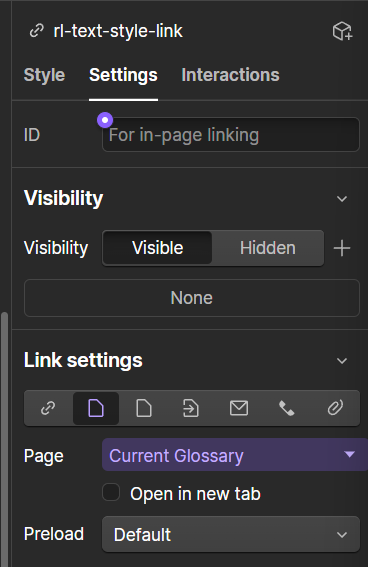
For this Div, set a Conditional visibility setting to show only when “Definition is not set” Also, add an ID for the Div, by using the “Term” field from the collection. This will allow us to use anchor links to scroll to the letter on the page.
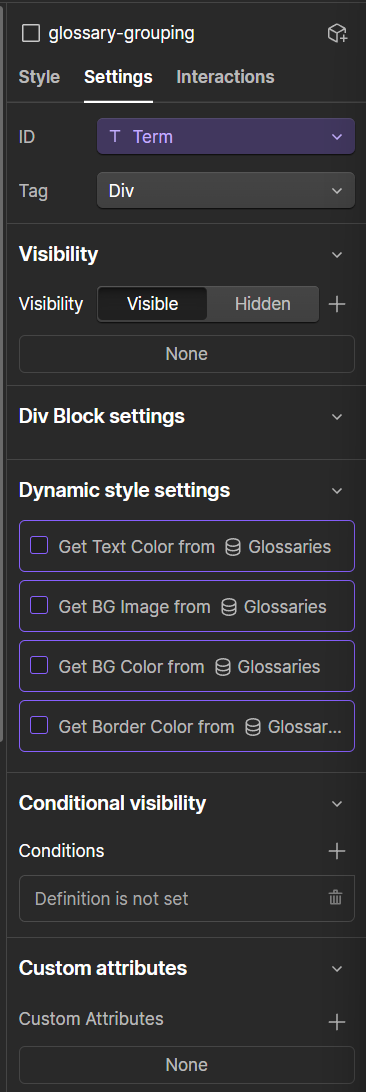
Add an H2 element and connect this to the “Term” field.
Now you should see the full alphabet listed, without any of the terms displayed on the page.
Add the second Div element, let’s call it “glossary-term”. For this element set the Conditional Visibility to have a condition to show only when a “Definition” value has been set.
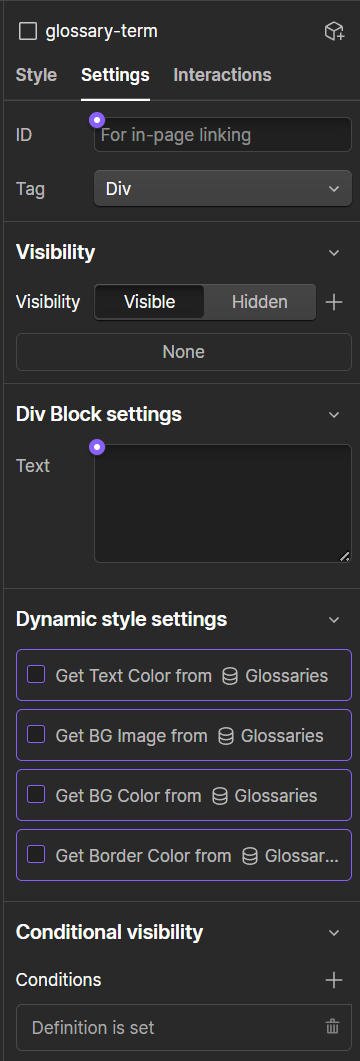
Add an H3 element and wrap the element in a Link block.
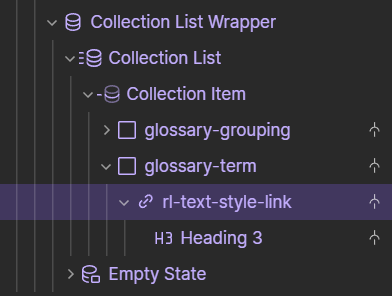
Connect the value of the H3 element to be the “Term” from your glossary and set the link of the link block to the Current “Glossary” item. That way users can click to read the full definition of the term on a separate page.
Now your full glossary should be visible on the page with all “Terms” nicely grouped under the corresponding letter of the alphabet.
Let's add a navigation bar with alphabetical links, allowing users to jump directly to specific letter sections. This will make navigating the page easier and improve user experience on the page, especially when you have a lot of terms covered in your glossary.
To create the alphabetical list, add another Collection List to your page above the glossary’s Collection List. For this collection list, make sure the Sort is again set to Alphabetical (A-Z). In this example we add Conditional Visibility to again show only values where the “Definition is not set”, so we only get the alphabet.
You’re free to style this as you wish. Here we’ve created a text element, wrapped it in a Div that we have styled with a background color and a border radius.
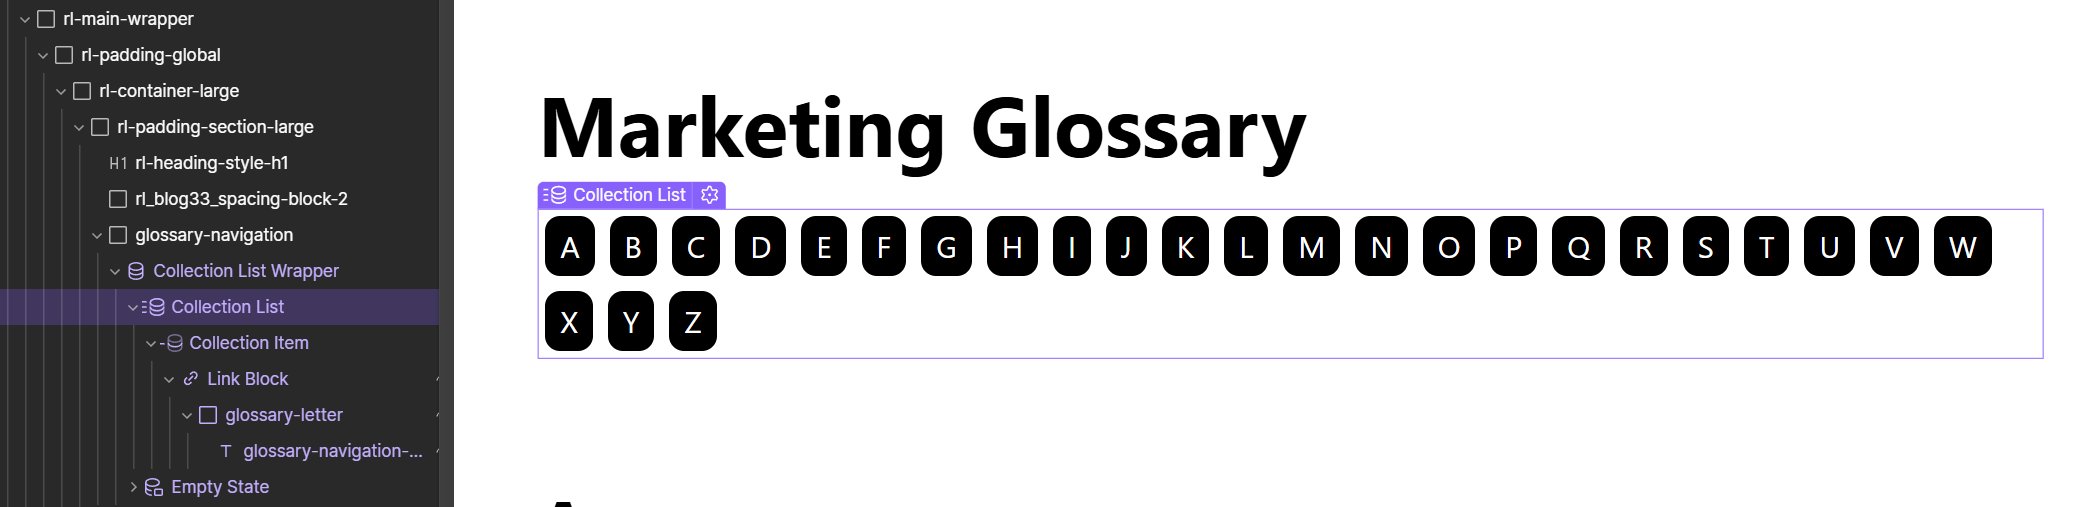
Remember to wrap your letter item in a Link Block and make this link block point to the Anchor link we have in our Glossaries collection. That way the user can click on the letter and get scrolled to the correct anchor on the page.
Now you should have a fully functional glossary, with a letter navigation on the top that scrolls to the correct letter, each term grouped underneath a letter, and the terms with a link to the definition for each term.
Let’s next setup the page to show the definitions for each of the terms.
Glossary definition collection page
As your glossary is in a collection, we will need to style the CMS Collection page for Glossaries. For each definition page we would like to show three things:
a breadcrumb on the top for easy navigation back to the Glossary
the Term as an H1
the full Definition below the Term
Let’s create breadcrumb navigation on the top of the page.
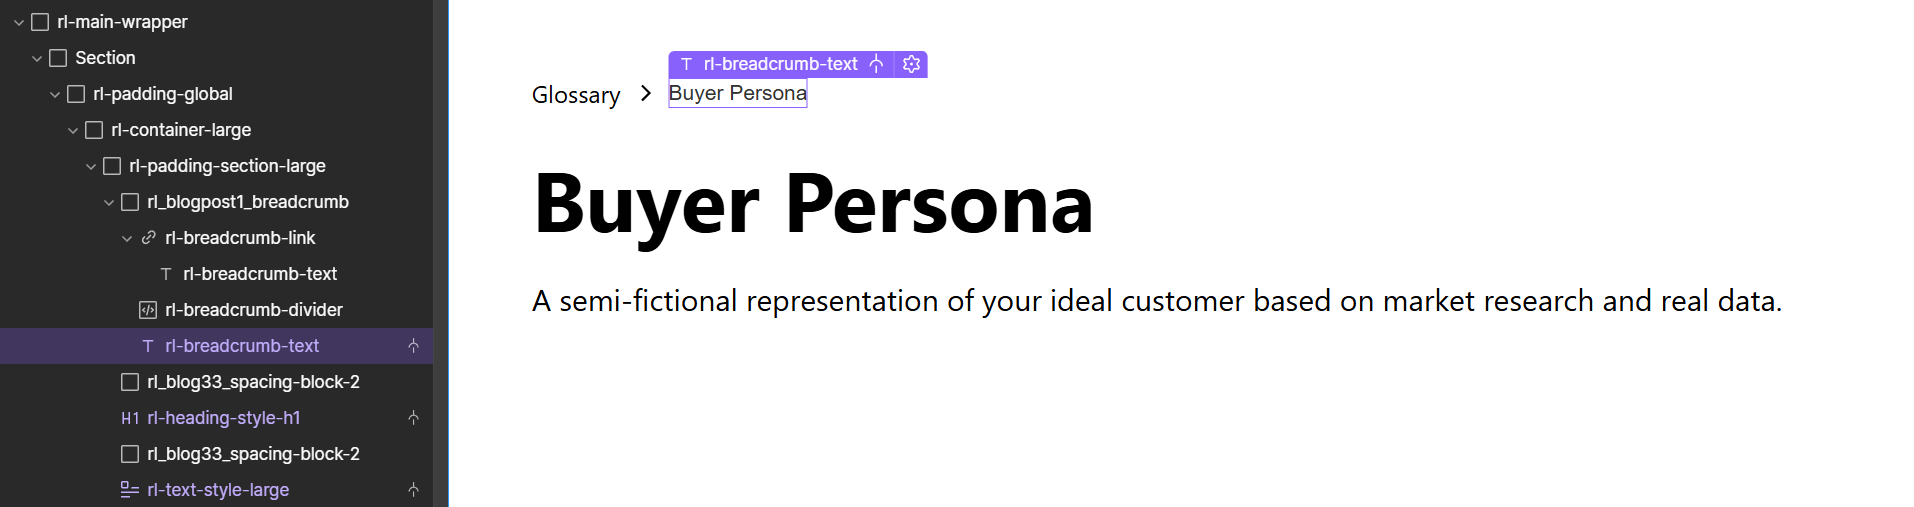
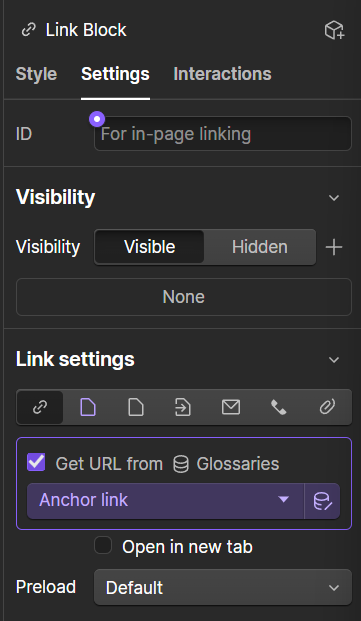
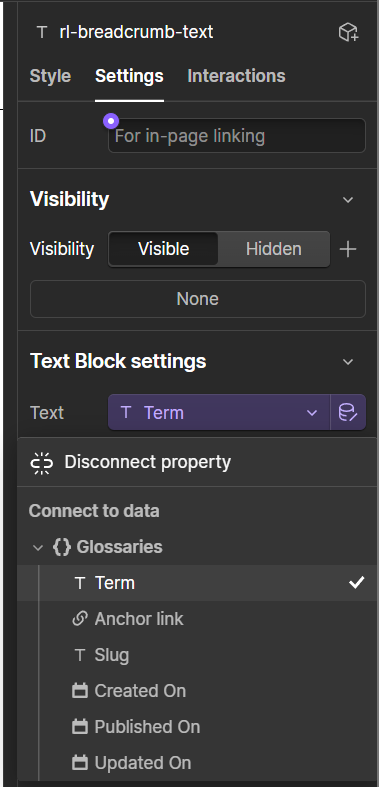
Add a link block with a text element inside it that says “Glossary” and a link to the Glossary page. Add some arrow icon or > to point to the text next to it. Add Text Block next to it and for the Text value we will use the Term from our Glossaries CMS collection.
For the content of the page, add an H1 element and connect that to the Term. Below it, add a Rich Text Element and connect that to the Definition.
Now we have a complete glossary ready with a glossary terms page and a definition page.
Final steps: SEO Settings & Publishing
Before we hit the publish button and share our Glossary to the world, let’s check that everything is set up properly for SEO.
Both pages we set up should be optimized for on-page SEO. We use a single H1 for the main heading and there’s a hierarchy of H2 and H3 headings on the glossary listing page. For the definition pages, we also used a single H1 for the Term and included a breadcrumb navigation.
There are a few more things you should check and consider before publishing.
1. Check that the content in your glossary is SEO optimized
Ensure that you are targeting the Term properly in your text and that there is enough content in the Definition that will perform with the associated keyword.
2. Check the page settings of both pages we created
Remember to set the Title Tag and Meta Description for both pages
3. Add some images
Consider adding some images to the glossary definition pages. Include alt texts and captions to each of the images.
Then finally, go ahead and publish your site along with your collection items!